picoCTF Writeup (Web問)その5
- Some Assembly Required 3(160pts)
- picobrowser (200pts)
- Client-side-again(200pts)
- Forbidden Paths(200pts)
- Power Cookie(200pts)
- Roboto Sans(200pts)
- Secrets(200pts)
Some Assembly Required 3(160pts)
フォームが一つある
wasmをみると、strcmp と check_flag 関数がflagをチェックしてるみたい
devtoolsのネットワークタブからバイナリファイルであるqCCYI0ajpDをダウンロード
以下よりwasmファイルとわかる
file qCCYI0ajpD
qCCYI0ajpD: WebAssembly (wasm) binary module version 0x1 (MVP)
wasmファイルをc言語に変換するwasm2cを実行し、変換したファイルを見ると以下の気になる部分を見つけた。
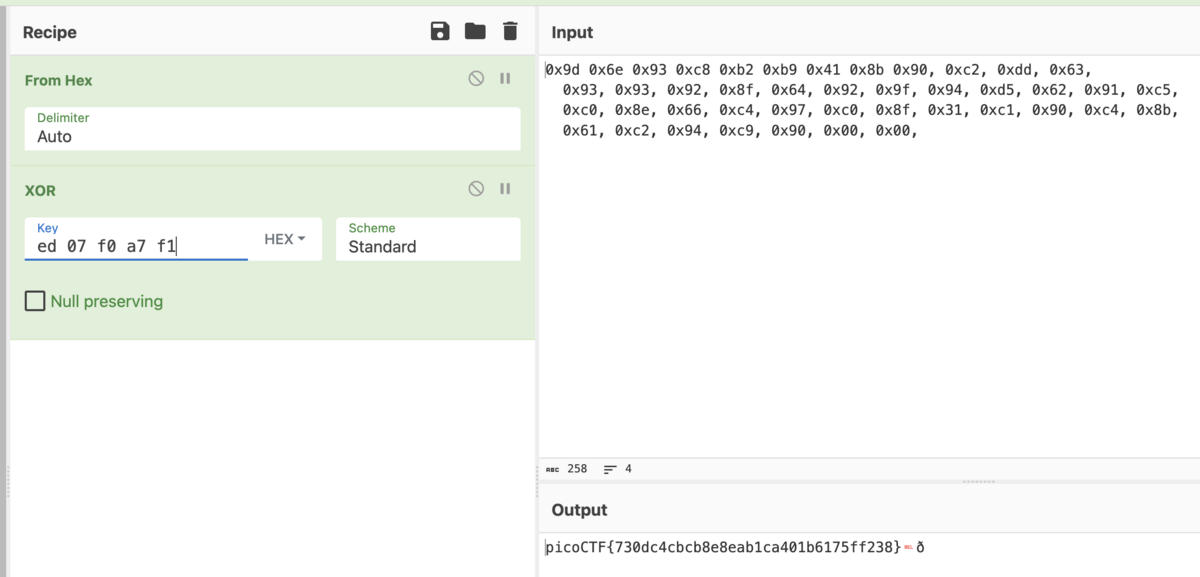
static const u8 data_segment_data_w2c_qCCYI0ajpD_d0[] = {
  0x9d, 0x6e, 0x93, 0xc8, 0xb2, 0xb9, 0x41, 0x8b, 0xc5, 0xc6, 0xdd, 0x61,
  0x93, 0xc3, 0xc2, 0xda, 0x3f, 0xc7, 0x93, 0xc1, 0x8b, 0x31, 0x95, 0x93,
  0x93, 0x8e, 0x62, 0xc8, 0x94, 0xc9, 0xd5, 0x64, 0xc0, 0x96, 0xc4, 0xd9,
  0x37, 0x93, 0x93, 0xc2, 0x90, 0x00, 0x00,
};

static const u8 data_segment_data_w2c_qCCYI0ajpD_d1[] = {
  0xf1, 0xa7, 0xf0, 0x07, 0xed,
};
XOR暗号化されていると仮定し、d1[]をXORして先頭がp(0x70)となるhexを見つける
data_0 = [0x9d, 0x6e, 0x93, 0xc8, 0xb2, 0xb9, 0x41, 0x8b, 0xc5, 0xc6, 0xdd, 0x61,
          0x93, 0xc3, 0xc2, 0xda, 0x3f, 0xc7, 0x93, 0xc1, 0x8b, 0x31, 0x95, 0x93,
          0x93, 0x8e, 0x62, 0xc8, 0x94, 0xc9, 0xd5, 0x64, 0xc0, 0x96, 0xc4, 0xd9,
          0x37, 0x93, 0x93, 0xc2, 0x90]
target_ascii = 0x70

for i in range(256):  # 0x00から0xFFまで
    if data_0[0] ^ i == target_ascii:
        print(f"Found key: 0x{i:02x}")
以下の結果より、0xedなのでd1[]をkeyにし末尾の要素から順にXOR暗号化していると仮定する
$python search.py
Found key: 0xed
以下のpythonコードでd0に対し、d1の順序を逆にしたものをkeyにしてXOR復号してみる
data_0 = [0x9d, 0x6e, 0x93, 0xc8, 0xb2, 0xb9, 0x41, 0x8b, 0xc5, 0xc6, 0xdd, 0x61,
          0x93, 0xc3, 0xc2, 0xda, 0x3f, 0xc7, 0x93, 0xc1, 0x8b, 0x31, 0x95, 0x93,
          0x93, 0x8e, 0x62, 0xc8, 0x94, 0xc9, 0xd5, 0x64, 0xc0, 0x96, 0xc4, 0xd9,
          0x37, 0x93, 0x93, 0xc2, 0x90]
key = [0xed, 0x07, 0xf0, 0xa7, 0xf1]


decoded_data = [d ^ key[i % len(key)] for i, d in enumerate(data_0)]

decoded_str = ''.join(chr(d) for d in decoded_data)
print(f"Decoded flag: {decoded_str}")
実行するとflagが入手できた
Decoded flag: picoCTF{b70fcd378740f6e4bce8388c01540c43}
CyberChefを使用した復号
参考:picoCTF Writeup picoGym Practice Challenges Some Assembly Required 3 (注意<spoiler>) #CTF - Qiita
picobrowser (200pts)
フォームが一つあり、Flagボタンを押すとYou're not picobrowser!と出た
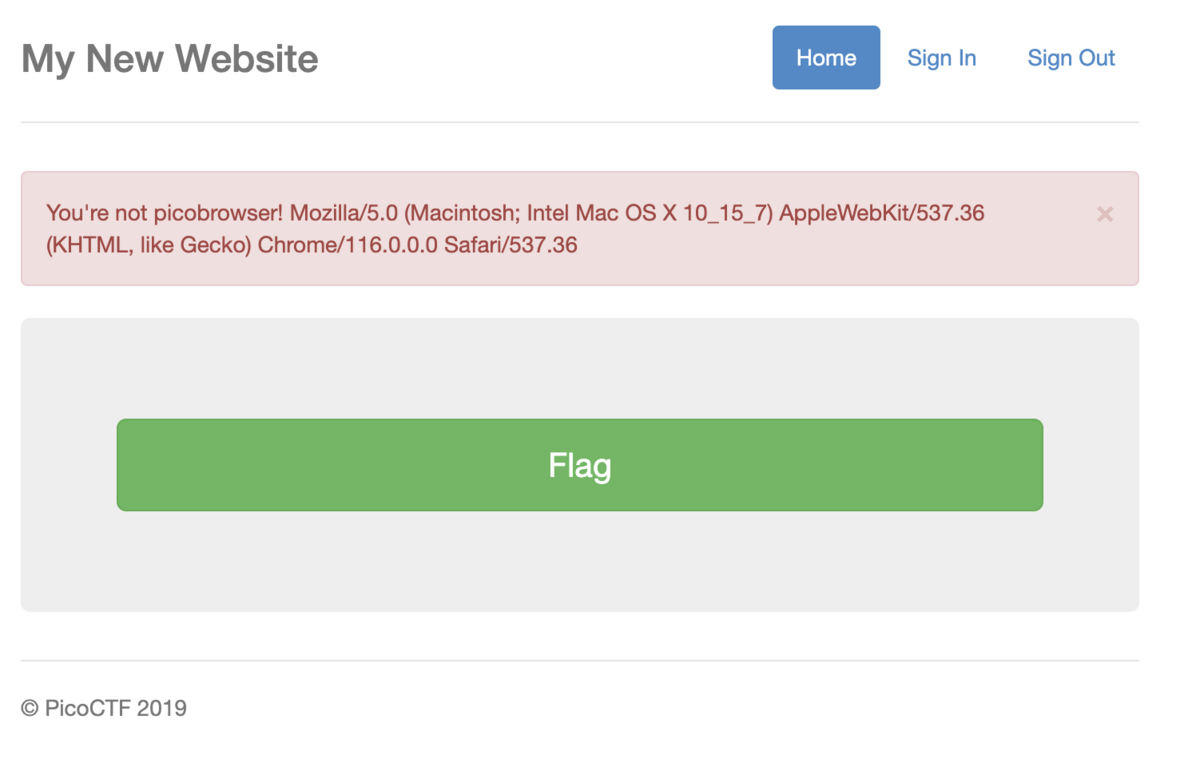
UserAgentをpicobrowserに変更してボタンを押すとflagが入手できた
Client-side-again (200pts)
アクセスすると入力フォームがある
devtoolsで見ると、javascriptでflagチェックを行なっていそうな箇所を見つけた
そのままでは見にくいので整形する
var _0x5a46 = ['37115}', '_again_3', 'this', 'Password Verified', 'Incorrect password', 'getElementById', 'value', 'substring', 'picoCTF{', 'not_this'];
(function (_0x4bd822, _0x2bd6f7) {
  var _0xb4bdb3 = function (_0x1d68f6) {
    while (--_0x1d68f6) {
      _0x4bd822['push'](_0x4bd822['shift']());
    }
  };
  _0xb4bdb3(++_0x2bd6f7);
}(_0x5a46, 0x1b3));
var _0x4b5b = function (_0x2d8f05, _0x4b81bb) {
  _0x2d8f05 = _0x2d8f05 - 0x0;
  var _0x4d74cb = _0x5a46[_0x2d8f05];
  return _0x4d74cb;
};

function verify() {
  checkpass = document[_0x4b5b('0x0')]('pass')[_0x4b5b('0x1')];
  split = 0x4;
  if (checkpass[_0x4b5b('0x2')](0x0, split * 0x2) == _0x4b5b('0x3')) {
    if (checkpass[_0x4b5b('0x2')](0x7, 0x9) == '{n') {
      if (checkpass[_0x4b5b('0x2')](split * 0x2, split * 0x2 * 0x2) == _0x4b5b('0x4')) {
        if (checkpass[_0x4b5b('0x2')](0x3, 0x6) == 'oCT') {
          if (checkpass[_0x4b5b('0x2')](split * 0x3 * 0x2, split * 0x4 * 0x2) == _0x4b5b('0x5')) {
            if (checkpass['substring'](0x6, 0xb) == 'F{not') {
              if (checkpass[_0x4b5b('0x2')](split * 0x2 * 0x2, split * 0x3 * 0x2) == _0x4b5b('0x6')) {
                if (checkpass[_0x4b5b('0x2')](0xc, 0x10) == _0x4b5b('0x7')) {
                  alert(_0x4b5b('0x8'));
                }
              }
            }
          }
        }
      }
    }
  } else {
    alert(_0x4b5b('0x9'));
  }
}
oCTとかflagっぽいものは見えるがよくわからない...
このコードはverifyという関数でflagと一致するかを調べているみたい
難読化されているため、一つ一つ確認してみる
配列 _0x5a46 の内容
- _0x5a46[0] = '37115}'
- 0x5a46[1] = 'again_3'
- _0x5a46[2] = 'this'
- _0x5a46[3] = 'Password Verified'
- _0x5a46[4] = 'Incorrect password'
- _0x5a46[5] = 'getElementById'
- _0x5a46[6] = 'value'
- _0x5a46[7] = 'substring'
- _0x5a46[8] = 'picoCTF{'
- _0x5a46[9] = 'not_this'
ここで、Password Verifiedや'Incorrect password'はフォーム入力した際に出るものだからflagに含まれなさそう
alert(_0x4b5b('0x8'));やalert(_0x4b5b('0x9'));より、0x4b5b('0x8')は'Password Verified'、0x4b5b('0x9')は'Incorrect password'だとわかる
また、'getElementById'はHTML要素のidを取得するものであり、プログラム中に'getElementById'は配列内にしかないため、配列の要素として取り出して使っていることがわかり、これもflagに含まれない
そして'getElementById'を使用するなら'value'も使用されていると考えられるからそれもflagに含まれない
上記の点を踏まえるとflagになりそうな文字列は'37115}'、_again_3'、'this'、'substring'、'picoCTF{'、'not_this'であり、これらの組み合わせではないかと現時点で推測できる
関数_0x4b5bの動作
// 初期化
var _0x5a46 = ['37115}', '_again_3', 'this', 'Password Verified', 'Incorrect password', 'getElementById', 'value', 'substring', 'picoCTF{', 'not_this'];

// この即時関数は配列を操作する
(function (_0x4bd822, _0x2bd6f7) {

  // この内部関数は配列をシフトしてプッシュする操作を行う
  var _0xb4bdb3 = function (_0x1d68f6) {

    while (--_0x1d68f6) {

      _0x4bd822['push'](_0x4bd822['shift']());  // 配列の最初の要素を取り出して最後に追加
    }
  };

  _0xb4bdb3(++_0x2bd6f7);  // 435回、配列の操作を行う


}(_0x5a46, 0x1b3)); // _0x2bd6f7は0x1b3(10進数で435)


// 難読化された文字列を解読する関数
var _0x4b5b = function (_0x2d8f05, _0x4b81bb) {
  // _0x2d8f05を数値に変換(この場合、16進数から10進数に)
  _0x2d8f05 = _0x2d8f05 - 0x0;

  // `_0x5a46配列から_0x2d8f05インデックスの要素を取得して、_0x4d74cbに格納
  var _0x4d74cb = _0x5a46[_0x2d8f05];

  // _0x4d74cbの値を返す
  return _0x4d74cb;
};
どういう動作をするのかイマイチよくわからないので実際に実行してみる
以下のコードをコンソールに貼り付けて実行
// 初期の配列
var _0x5a46 = ['37115}', '_again_3', 'this', 'Password Verified', 'Incorrect password', 'getElementById', 'value', 'substring', 'picoCTF{', 'not_this'];

// 配列の操作関数
(function (_0x4bd822, _0x2bd6f7) {
  var _0xb4bdb3 = function (_0x1d68f6) {
    while (--_0x1d68f6) {
      _0x4bd822['push'](_0x4bd822['shift']());
    }
  };
  _0xb4bdb3(++_0x2bd6f7);
}(_0x5a46, 0x1b3));

// 配列の状態を出力
console.log(_0x5a46);
出力は以下のようになった
(10) ['getElementById', 'value', 'substring', 'picoCTF{', 'not_this', '37115}', '_again_3', 'this', 'Password Verified', 'Incorrect password']
0: "getElementById"
1: "value"
2: "substring"
3: "picoCTF{"
4: "not_this"
5: "37115}"
6: "_again_3"
7: "this"
8: "Password Verified"
9: "Incorrect password"
次にverify関数を解析する
function verify() {
  // 入力されたパスワードを取得
  // document[_0x4b5b('0x0')]('pass') は document.getElementById('pass') にマッピングされている
  // [_0x4b5b('0x1')] は ['value'] にマッピングされている
  checkpass = document[_0x4b5b('0x0')]('pass')[_0x4b5b('0x1')];
  split = 0x4;  // splitは4として設定

  // 条件に一致するかどうかでアラートを出す
  //  _0x4b5b('0x2')はsubstring
  // 0番目から7番目までの文字列を切り出し、それが"picoCTF{" (_0x4b5b('0x3') )なら次へ
  if (checkpass[_0x4b5b('0x2')](0x0, split * 0x2) == _0x4b5b('0x3')) {

    // 7番目から8番目までを取り出し"{n"
    if (checkpass[_0x4b5b('0x2')](0x7, 0x9) == '{n') {
      //  8番目から15番目までを取り出し、 "not_this"
      if (checkpass[_0x4b5b('0x2')](split * 0x2, split * 0x2 * 0x2) == _0x4b5b('0x4')) {
        // 3番目から5番目までを取り出し、"oCT"
        if (checkpass[_0x4b5b('0x2')](0x3, 0x6) == 'oCT') {
          // 24番目から31番目までを取り出し、"37115}"
          if (checkpass[_0x4b5b('0x2')](split * 0x3 * 0x2, split * 0x4 * 0x2) == _0x4b5b('0x5')) {
            // 省略
            if (checkpass['substring'](0x6, 0xb) == 'F{not') {
              if (checkpass[_0x4b5b('0x2')](split * 0x2 * 0x2, split * 0x3 * 0x2) == _0x4b5b('0x6')) {
                if (checkpass[_0x4b5b('0x2')](0xc, 0x10) == _0x4b5b('0x7')) {
                  alert(_0x4b5b('0x8'));
                }
              }
            }
          }
        }
      }
    }
  } else {
    alert(_0x4b5b('0x9'));
  }
}
Forbidden Paths(200pts)
Can you get the flag? Here's the website. We know that the website files live in /usr/share/nginx/html/ and the flag is at /flag.txt but the website is filtering absolute file paths. Can you get past the filter to read the flag?
サイトにアクセスすると、入力フォームといくつかのテキストファイル名が書かれている
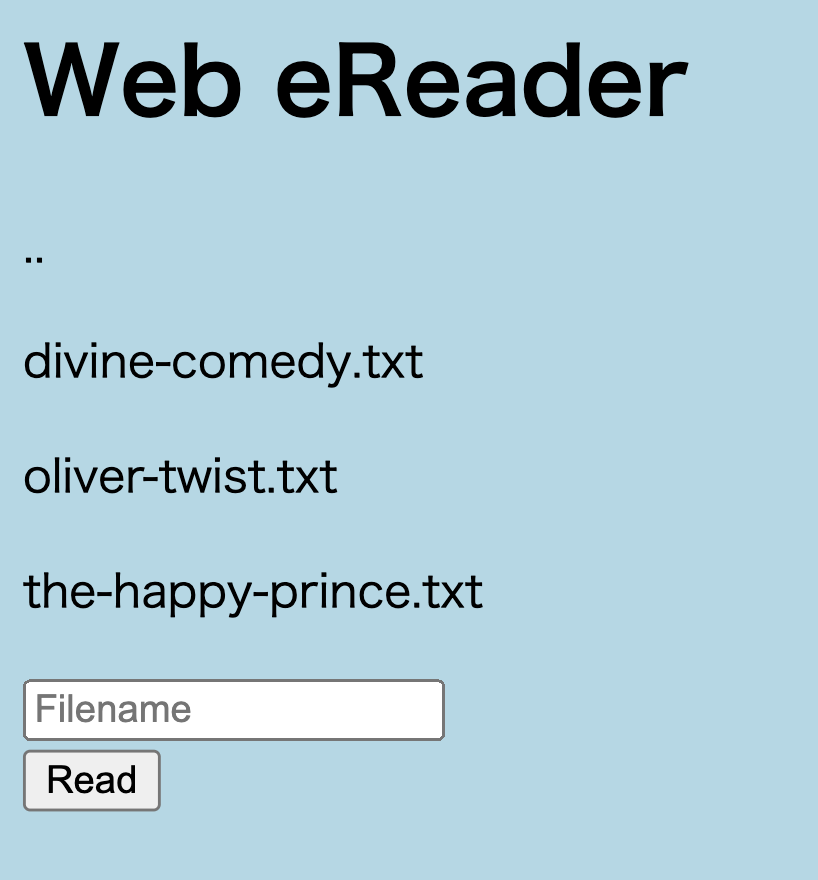
テキストファイル名を入力すると、そのテキストファイルの中身が参照された
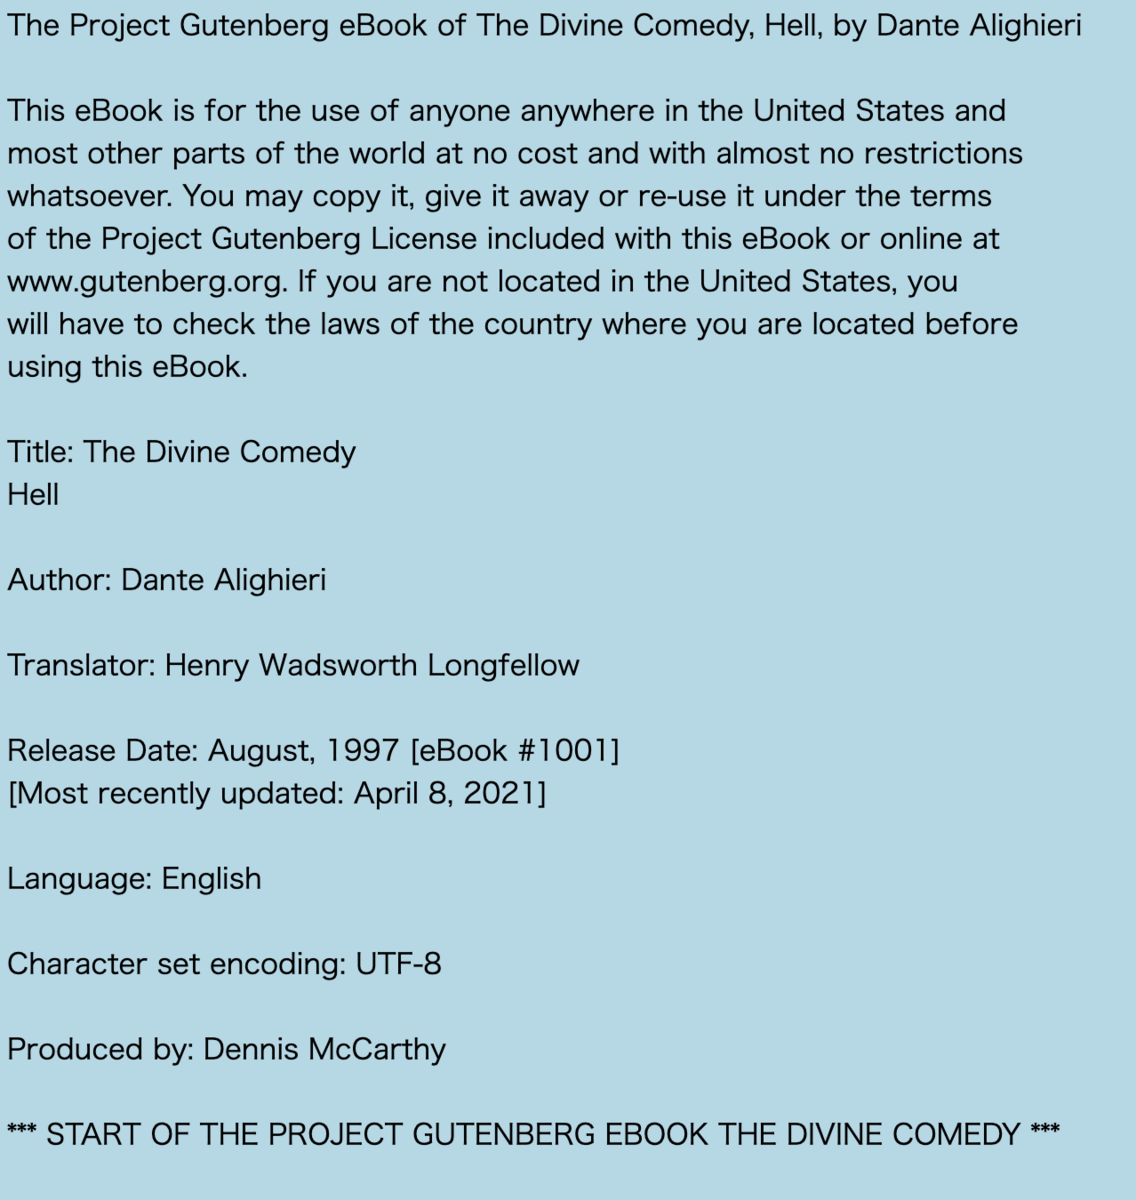
divine-comedy.txtと入力した場合
このことから、書かれているテキストファイルはカレントディレクトリのものと考え、問題文から/usr/share/nginx/html/でflag.txtという名前で格納されていることがわかるので、現在の位置を/html/と仮定し、../../../../flag.txtと入力してみるとflag.txtの中身が参照され、flagが入手できた
Power Cookie(200pts)
Description Can you get the flag? Go to this website and see what you can discover.
ボタンが一つあり、押すとguestサービスはないと言われた
cookieの名前がadminで値が0だったので1に変更するとflagが入手できた
Roboto Sans(200pts)
Description The flag is somewhere on this web application not necessarily on the website. Find it. Check this out.
問題文より、webアプリケーションのどこかにflagがあると書いてあるためrobots.txtを見ると以下が出た
User-agent *
Disallow: /cgi-bin/
Think you have seen your flag or want to keep looking.

ZmxhZzEudHh0;anMvbXlmaW
anMvbXlmaWxlLnR4dA==
svssshjweuiwl;oiho.bsvdaslejg
Disallow: /wp-admin/
以下の3つの文字列はbase64であるため復号してみる
- ZmxhZzEudHh0
- anMvbXlmaW
- anMvbXlmaWxlLnR4dA==
base64の特徴
文字セット: Base64エンコーディングは大文字A-Z、小文字a-z、数字0-9、および+、/の64の文字セットを使用。また、=はパディングとして使用される
パディング: Base64エンコードされたデータは、=記号で終わることがよくあり、元のデータの長さが3の倍数でない場合に追加される
復号すると、以下のようになる
- flag1.txt
- js/myfi
- js/myfile.txt
これらのURLにアクセスしてみるとjs/myfile.txtでflagが入手できた。
Secrets(200pts)
Description We have several pages hidden. Can you find the one with the flag? The website is running here.
アクセスしてボタンクリックによるページ遷移をdevtoolsを見ながら試したがflagのヒントは得られなかった
ソースを確認すると画像やcssファイルはsecretディレクトリの中にあったので、http://saturn.picoctf.net:65455/secret/にアクセスしてみると、遷移に成功し「Finally. You almost found me. you are doing well」と表示された
先ほどと同様にソースを確認すると/secret/hiddenディレクトリがあるため、アクセスしてみるとログインフォームが表示された
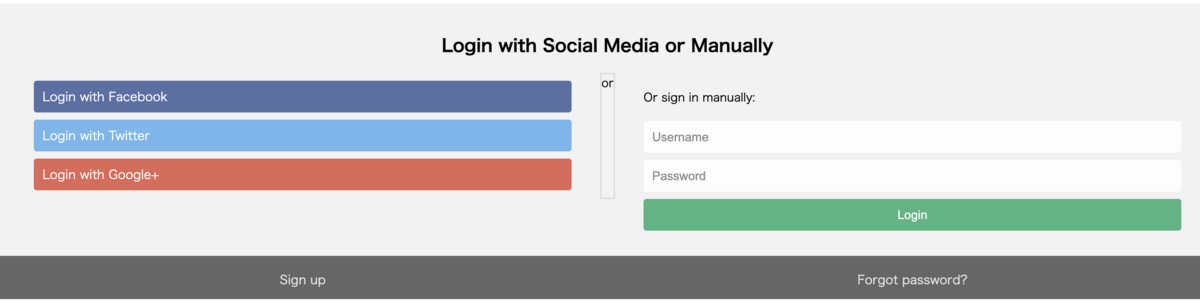
フォームに対してSQLインジェクションを仕掛けたが成功しなかった
(これを突破できれば良いと考えて時間をたくさん使っちゃった...)
全くわからずお手上げ状態だったが、またディレクトリの遷移をすれば良いのではと考え、ソースを確認するとsuperhiddenがあり、アクセスしてみると「
Finally. You found me. But can you see me」と表示され、devtoolsで見るとflagを入手できた。